Well it's a lovely warm day, and considering what was on the ground that means MUD... the dreaded "M" word. I really, really love mud... don't you? Especially since it's all clay mud which as it sticks to your shoes adds 50lbs to your foot.. or at least feels that way. Today we went out and put the rebar stakes into the MUDDY ground. 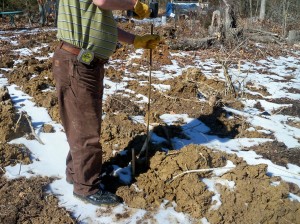 The ground is just squishy enough to make it easy to get into the ground, I almost wish we had the ground rods to put into the ground, they would be very easy to get into the ground right now. While we were doing the pounding my son who doesn't currently attend a church got to stand in the middle of the mud circle and hold our 100ft tape to make sure we had the right length from the center. We also had to measure the distance between each one which needed to be 6ft 8in between each one. The rebar "arches" need to be slightly off of where we put our stakes so that there is an opening in the center of the top of the dome. traditionally this is where a chimney is put. We are going to put glass block windows, vents and a whole house fan in a small addition above the top of the dome in the center. Silver is planning to find a way to run the chimney up it as well, but we need to figure out the logistics of it first.
 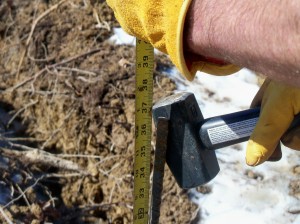 The ground stakes have to be in the ground 2 foot so the 5 ft rebar stakes need to only have 3ft above the ground. So after placing all the stakes Silver went back around and pounded them into the ground till they reached the correct depth. We only had issue in one spot:
 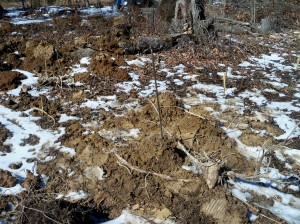 I am not sure if you can see it, but this one here is stuck in a frozen block of clay, so once we have enough above freezing days we should be able to go back and fix this one. Well it figures we'd have one that would not be able to be at the proper depth. We should have really gone out and fixed some of the mud piles before the bad weather came through.. but you know what they say about hindsight. I'll also have you know that as I am writing this.. all that snow you see in the picture? Yeah... it's gone, not there... just the MUD! So when we finished putting the stakes in we spent some time looking for the orange "tape" to mark where the stakes are as they are a tad hard to see against the browns.
 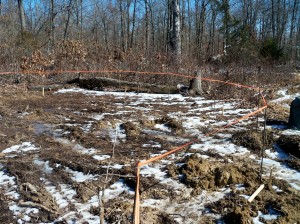 It is much easier to see the outline with the tape on the rebar. also this is taken at the place where our door for the house will be put. The nice thing about it is that the door will open to just across from our soon to be outdoor kitchen. I think that is very convenient. As you can see from this picture there is much more mud than snow now, at this point we had the kids moving the rebar from up front to the house ring as Silver is going to start making the arches. The arches is what the second floor is suppose to be connected to so that it is more secure, I'm not sure if we are going to do it that way as yet and Silver is thinking we may only need to make half of a second floor based on how much space there is in the interior. As for the start of the arches...
 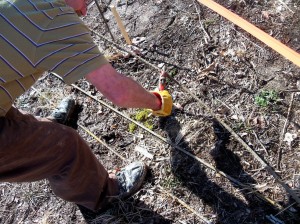 First, after we set out three pieces of rebar of course. We needed to bend the rebar, Silver discovered after trying to use his "bending" tool that it wasn't going to work very well. That is because when he first tried to bend it the tool bent. So as you can see he went and got out the pipe wrenches and used them with me standing on one end of the rebar while he hand bent them. The one downside I have to say for the birdcage dome site is that they do not mention how they bent their rebar. So we had to figure it out ourselves. So we had to bend two of three pieces, the two end pieces. The center piece gets bent when you attach them together. We discovered it's much easier to bend with the help of two children in addition to me standing on the rebar. So after the bending comes tying the rebar together.
 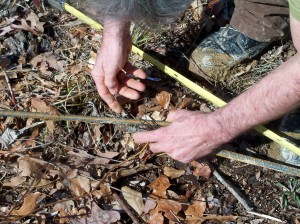 We are using rebar ties to connect them together, now we have seen people using zip ties. While they will hold a great deal, I think using the metal rebar ties will be 100% better as then they will be part of the concrete with the rebar. Silver is planning on using a couple of zip ties then we put the arches up and need to temporarily secure them to the rebar stakes while we get the others in place. Then will go around and use the metal ties to finish securing them. Incidentally we did not put this one in place as we have discovered we need to have a ladder or a scaffolding in place to do that as we need someone at the top to hold it in place while it is secured. As it is flimsy while being strong. I know once they are all in place they will be much more secure, jut one by itself would not be. We only put one arch together so as to get the "idea" of how to do it for the first time. Notice in the picture... no snow at all and all the MUD on Silver's shoes? That was after he scraped the MUD off. The kids finished bringing back all the rebar, after some issue over figuring out how to navigate over the trench while carrying the rebar. We found one random plank to place across it, and it's kinda working. One child of course fell into the trench and had a fit over getting muddy, I guess a 13yr old doesn't think MUD is fun anymore. Well at least she had changed into the jeans she didn't want to wear before it happened so the pants she prefers are saved for school. So now we are all sitting around the house MUDDY waiting turns to bathe the MUD off. I'll be last as I have to go back out in it to get the laundry down. Then it's on to start cooking our dinner tonight. which will be a beef roast mashed taters and peas. YUM! So I hope everyone enjoys their start of MUD season... I know I am... rolls eyes Be Well BE Safe and Blessed BE...
 The ground is just squishy enough to make it easy to get into the ground, I almost wish we had the ground rods to put into the ground, they would be very easy to get into the ground right now. While we were doing the pounding my son who doesn't currently attend a church got to stand in the middle of the mud circle and hold our 100ft tape to make sure we had the right length from the center. We also had to measure the distance between each one which needed to be 6ft 8in between each one. The rebar "arches" need to be slightly off of where we put our stakes so that there is an opening in the center of the top of the dome. traditionally this is where a chimney is put. We are going to put glass block windows, vents and a whole house fan in a small addition above the top of the dome in the center. Silver is planning to find a way to run the chimney up it as well, but we need to figure out the logistics of it first.
  The ground stakes have to be in the ground 2 foot so the 5 ft rebar stakes need to only have 3ft above the ground. So after placing all the stakes Silver went back around and pounded them into the ground till they reached the correct depth. We only had issue in one spot:
  I am not sure if you can see it, but this one here is stuck in a frozen block of clay, so once we have enough above freezing days we should be able to go back and fix this one. Well it figures we'd have one that would not be able to be at the proper depth. We should have really gone out and fixed some of the mud piles before the bad weather came through.. but you know what they say about hindsight. I'll also have you know that as I am writing this.. all that snow you see in the picture? Yeah... it's gone, not there... just the MUD! So when we finished putting the stakes in we spent some time looking for the orange "tape" to mark where the stakes are as they are a tad hard to see against the browns.
  It is much easier to see the outline with the tape on the rebar. also this is taken at the place where our door for the house will be put. The nice thing about it is that the door will open to just across from our soon to be outdoor kitchen. I think that is very convenient. As you can see from this picture there is much more mud than snow now, at this point we had the kids moving the rebar from up front to the house ring as Silver is going to start making the arches. The arches is what the second floor is suppose to be connected to so that it is more secure, I'm not sure if we are going to do it that way as yet and Silver is thinking we may only need to make half of a second floor based on how much space there is in the interior. As for the start of the arches...
  First, after we set out three pieces of rebar of course. We needed to bend the rebar, Silver discovered after trying to use his "bending" tool that it wasn't going to work very well. That is because when he first tried to bend it the tool bent. So as you can see he went and got out the pipe wrenches and used them with me standing on one end of the rebar while he hand bent them. The one downside I have to say for the birdcage dome site is that they do not mention how they bent their rebar. So we had to figure it out ourselves. So we had to bend two of three pieces, the two end pieces. The center piece gets bent when you attach them together. We discovered it's much easier to bend with the help of two children in addition to me standing on the rebar. So after the bending comes tying the rebar together.
  We are using rebar ties to connect them together, now we have seen people using zip ties. While they will hold a great deal, I think using the metal rebar ties will be 100% better as then they will be part of the concrete with the rebar. Silver is planning on using a couple of zip ties then we put the arches up and need to temporarily secure them to the rebar stakes while we get the others in place. Then will go around and use the metal ties to finish securing them. Incidentally we did not put this one in place as we have discovered we need to have a ladder or a scaffolding in place to do that as we need someone at the top to hold it in place while it is secured. As it is flimsy while being strong. I know once they are all in place they will be much more secure, jut one by itself would not be. We only put one arch together so as to get the "idea" of how to do it for the first time. Notice in the picture... no snow at all and all the MUD on Silver's shoes? That was after he scraped the MUD off. The kids finished bringing back all the rebar, after some issue over figuring out how to navigate over the trench while carrying the rebar. We found one random plank to place across it, and it's kinda working. One child of course fell into the trench and had a fit over getting muddy, I guess a 13yr old doesn't think MUD is fun anymore. Well at least she had changed into the jeans she didn't want to wear before it happened so the pants she prefers are saved for school. So now we are all sitting around the house MUDDY waiting turns to bathe the MUD off. I'll be last as I have to go back out in it to get the laundry down. Then it's on to start cooking our dinner tonight. which will be a beef roast mashed taters and peas. YUM! So I hope everyone enjoys their start of MUD season... I know I am... rolls eyes Be Well BE Safe and Blessed BE...
  RSS Feed