Well it's a lovely warm day, and considering what was on the ground that means MUD... the dreaded "M" word. I really, really love mud... don't you? Especially since it's all clay mud which as it sticks to your shoes adds 50lbs to your foot.. or at least feels that way. Today we went out and put the rebar stakes into the MUDDY ground. 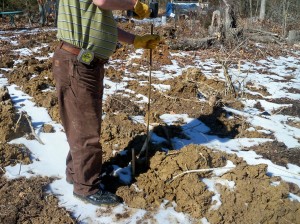 The ground is just squishy enough to make it easy to get into the ground, I almost wish we had the ground rods to put into the ground, they would be very easy to get into the ground right now. While we were doing the pounding my son who doesn't currently attend a church got to stand in the middle of the mud circle and hold our 100ft tape to make sure we had the right length from the center. We also had to measure the distance between each one which needed to be 6ft 8in between each one. The rebar "arches" need to be slightly off of where we put our stakes so that there is an opening in the center of the top of the dome. traditionally this is where a chimney is put. We are going to put glass block windows, vents and a whole house fan in a small addition above the top of the dome in the center. Silver is planning to find a way to run the chimney up it as well, but we need to figure out the logistics of it first. 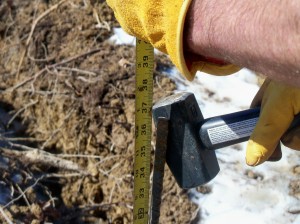 The ground stakes have to be in the ground 2 foot so the 5 ft rebar stakes need to only have 3ft above the ground. So after placing all the stakes Silver went back around and pounded them into the ground till they reached the correct depth. We only had issue in one spot: 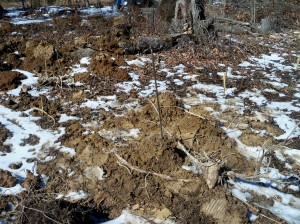 I am not sure if you can see it, but this one here is stuck in a frozen block of clay, so once we have enough above freezing days we should be able to go back and fix this one. Well it figures we'd have one that would not be able to be at the proper depth. We should have really gone out and fixed some of the mud piles before the bad weather came through.. but you know what they say about hindsight. I'll also have you know that as I am writing this.. all that snow you see in the picture? Yeah... it's gone, not there... just the MUD! So when we finished putting the stakes in we spent some time looking for the orange "tape" to mark where the stakes are as they are a tad hard to see against the browns. 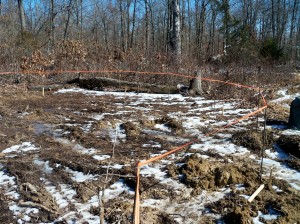 It is much easier to see the outline with the tape on the rebar. also this is taken at the place where our door for the house will be put. The nice thing about it is that the door will open to just across from our soon to be outdoor kitchen. I think that is very convenient. As you can see from this picture there is much more mud than snow now, at this point we had the kids moving the rebar from up front to the house ring as Silver is going to start making the arches. The arches is what the second floor is suppose to be connected to so that it is more secure, I'm not sure if we are going to do it that way as yet and Silver is thinking we may only need to make half of a second floor based on how much space there is in the interior. As for the start of the arches... 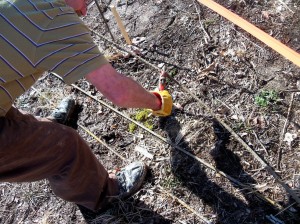 First, after we set out three pieces of rebar of course. We needed to bend the rebar, Silver discovered after trying to use his "bending" tool that it wasn't going to work very well. That is because when he first tried to bend it the tool bent. So as you can see he went and got out the pipe wrenches and used them with me standing on one end of the rebar while he hand bent them. The one downside I have to say for the birdcage dome site is that they do not mention how they bent their rebar. So we had to figure it out ourselves. So we had to bend two of three pieces, the two end pieces. The center piece gets bent when you attach them together. We discovered it's much easier to bend with the help of two children in addition to me standing on the rebar. So after the bending comes tying the rebar together. 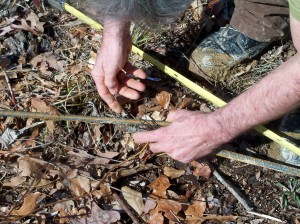 We are using rebar ties to connect them together, now we have seen people using zip ties. While they will hold a great deal, I think using the metal rebar ties will be 100% better as then they will be part of the concrete with the rebar. Silver is planning on using a couple of zip ties then we put the arches up and need to temporarily secure them to the rebar stakes while we get the others in place. Then will go around and use the metal ties to finish securing them. Incidentally we did not put this one in place as we have discovered we need to have a ladder or a scaffolding in place to do that as we need someone at the top to hold it in place while it is secured. As it is flimsy while being strong. I know once they are all in place they will be much more secure, jut one by itself would not be. We only put one arch together so as to get the "idea" of how to do it for the first time. Notice in the picture... no snow at all and all the MUD on Silver's shoes? That was after he scraped the MUD off. The kids finished bringing back all the rebar, after some issue over figuring out how to navigate over the trench while carrying the rebar. We found one random plank to place across it, and it's kinda working. One child of course fell into the trench and had a fit over getting muddy, I guess a 13yr old doesn't think MUD is fun anymore. Well at least she had changed into the jeans she didn't want to wear before it happened so the pants she prefers are saved for school. So now we are all sitting around the house MUDDY waiting turns to bathe the MUD off. I'll be last as I have to go back out in it to get the laundry down. Then it's on to start cooking our dinner tonight. which will be a beef roast mashed taters and peas. YUM! So I hope everyone enjoys their start of MUD season... I know I am... rolls eyes Be Well BE Safe and Blessed BE...
Well here we are the morning after the storm and I'm making brownies. Sourdough brownies specifically, it takes about 25 minutes after the sponge sets most of the night to mix them. However I am a tad worried that they might come out a bit burnt as my oven is now running a lot hotter than it was before.
As for the storm...? Well we have ice, we have snow, and we have power. That makes me happy, not long after my post yesterday our internet went out for the whole day, it was expected as we have satellite internet; breathe the wrong way and it goes out. The kids again have no school so lets see... They had a total of 2 days of school this week, guess it's better then them not having any school at all. Granted though some school are having a late start today it would be near impossible for them to walk to the bus stop safely. Also as Silver mentioned yesterday due to the ice, we are not driving for the next couple of days.
We are planning on either tomorrow or Sunday to go out and set the rebar stakes into the ground, more likely on Sunday as we are going to be in the 50's then. Maybe I'll cook something outside on our mini grill if it's going to be that nice out. Though we had something interesting in the storm previous to yesterday's. The old dishwasher that was left on our property before we got here that we are going to turn into a smoker was knocked onto it's side by wind. Now it's sat on it's base for years and a couple of days ago it gets knocked over? Defiantly a strong wind, or rather strong gusts. The wind that day also picked up one of our 2 good outdoor chairs and dropped it in the pond breaking it. So now we are down to one outdoor chair, we need a couple more; hopefully we can find some more cheaply as we still have building supplies to buy.
Speaking of which on next Friday we will have money again and after bills/animal feed/gas are paid for and my DL is replaced we are going to go and buy soil for the apple trees then the next item on our building supply list. Which may be either wire, pipe or fencing for the dome itself. Depends on what we have left really.
Well have a nice day all, I have to go check my brownies as they are starting to smell very done way to soon. Where did I put that aluminum foil again?
Be Well, Be Safe, and Blessed Be...
We have had a great weekend so far folks! We got some of our building money, and we have a load of rebar coming tomorrow. We have decided to go down to a 34ft diameter dome. When we staked it (40 ft dome) out we noticed that we mis-staked it and the 34ft is not that much smaller than what we had staked out..
I got my apple trees ordered, I ordered ultra mac's for Silver and double delicious for me. I love the golden and red delicious. The company I ordered from a local nursery for this state Stark Bros nursery, they offered free shipping on orders over $85. So as I ordered 2 of each the order with the free shipping was just over $100. So I saved at least $20.
We had gotten a “pay later” flower catalog, that had Dahlias (edible root) and a few herb and bee friendly plants, We have been approved on their credit plan and I have a order of quite a few flowers coming that will be planted in a few various places one being our outdoor kitchen that will make it nice there and I will have lots of butterflies, bees, and humming birds stopping by.
We have also prepaid on the track hoe for next weekend as we had rain yesterday evening and this morning it would have been a waste of time and money getting it for this weekend. My son is crossing his fingers and behaving overly well in the hopes of getting to learn how to use it. Well, a 16yr old boy should have that opportunity to learn it. He's not doing all the work however. Especially since we need to dig a ditch from the power pole out to the clearing. I'm NOT having a child no matter how old digging near the power pole.
The next pay day we are going to get the chicks ordered, I wanted to do it Friday; but we didn't get a chance to. I did get the chick food and the new light for them. We will still need some pine bedding and a cover for the brooder before they get here though.
Now for the next week we have to clear area for the track hoe to run in. Yesterday my son and Silver started on it before the rain showed up. They'll go back out today after the rain lets up and it drys up a bit. Tomorrow it'll be just me and Silver working out there.
On another note, I was thinking about the weather and I believe we are already in our “Spring pattern” for here as we are getting tons of rain. Which is normal Spring weather here. Oh, my plant starts have started sprouting. Cabbages, grains, and tomatoes; also a couple of herbs! I am very happy about that.
I hope everyone is having a good weekend!
Be Well, Be Safe, and Blessed Be...
So here I am with what now seems to be a once a week update of sorts.
I started my plants yesterday I filled 2 trays so far, and I'm thinking of in a month or so starting cukes and squashes to see if they grow better from starts. I discovered that I did not use up all the sugar cane seeds I got from Listia so I put six into the tray to see if I can get them from starting in the house. I'm using a “all weather” birding journal to keep tabs on this year's plants and with what I planted yesterday I have nearly filled all the lined pages.
Silver has pointed out that I probably should wet the starting mix before I put it into the “cells” so I don't have to water under them to avoid losing my seeds. ...hindsight... I defiantly think I'll be doing that next time.
I am hoping for 100% on my plants, but who really knows right? I have it set for 12 of each of the two types of tomatoes that I want to grow. I did 6 sweet peppers 2 of each of the ones I have and 6 hot peppers 3 of two of the multitude I have of those. I have some onions planted as well as cabbage, mini Bak Choi, edible chrysanthemums, nastrums, Kale, and a variety of herbs. I am hoping this time I get the lemon grass to grow good.
We have gone and found out how much a track hoe (wow it really is a “track hoe” ) would cost from a Saturday to Monday. It would be $350, and that's considering that Sunday is given as a freebie. Just need a nice weekend and the money and we can get the digging we need done. Oh, that price includes the trailer to bring it home.
We didn't get the package of insulation that I wanted to try to make the papercrete to try out, so we'll have to make an extra trip before we can buy supplies just to try it out. As I'd rather buy in large quantities only once and have it all delivered. We did discover that we are paying about ½ price when we buy the rebar in 20ft lengths, it's just a matter of getting it home after the fact. Which again would be best to include in a delivery option.
We did find out during the last rain storm that the area the house is going does get water during storms, but we are planning to build a bit off the ground; so we should be ok there.
Well I'm up again baking bread at this early hour and I need to return to it. Have a good day everyone!
Be Well, Be Safe, and Blessed Be...
We've been silent on the blog as we have not been able to get on the net as much as we'd like too. So an update to things going on here. Well we've had crazy weather again. For 3 days we've had spring-ish temperatures, yesterday we had severe weather in the form of severe thunderstorms and some tornadoes. Today the forecast is for occasional snow flurries and what ever our temperature this morning at 6am would be our high for today. It's so nice to see winter coming back, and I'm serious as I do have flowers that I don't want killed off due to the weather being wonky. Due to the rain yesterday our “pond” (which is still not finished being dug) is filled to the current spill over.
We have finally come to a good place in working with our wood stove, we have it burn new wood at the coal stage only and we have a smoldering fire all day and night. We don't “burn ourselves out” and it stays toasty enough. We also seem to have hit the spot in the wood pile where the densest wood seems to be at. Which is good for long burning anyway.
In the last week I have gotten up at 3 am to bake bread, I have to say I may be doing it more often. The bread I have made these last two times has been heavenly. Good flavor and just the right “weight” (if that makes sense), silver told me today that I need to get up at 3am every morning now. Guess that means he likes it huh?
We have made a small discovery that we hope will work like we think. Loews sells “blown in” insulation that is “green”. This insulation is made from shredded recycled paper. Silver has been wanting to do papercrete on the interior of the dome to insulate it. My only issue had been, where do we get that much paper. Then we noticed that insulation, we are planning on buying one bag and trying to mix some papercrete up and see if it does well with the insulation. If it works out I will let everyone know. Silver is also looking for a way to combine the wall flue of a Russian Masonry stove and a rocket mass heater. Any Recommendation would be helpful.
Be Well, Be Safe, and Blessed Be...
Ok, so remember the wood stove from last year the barrel stove that overheated our home. As you can see Stormy modeling it for us...  Now this wood stove did present us with a couple of PROBLEMS, I think the biggest was the use of space. It wasted tons of space, and going on the space theme, it also wasted space in the barrel. We only burned in the front of the barrel, so the whole back half was not being used. The other problem it presented was that we couldn't cook on the surface of it due to the fact that it had no upright flat surface. I think Silver has effectively solved all of those issues. We have built a pot-bellied barrel stove.  We started off with a new barrel stove kit bought for: $39.99 Got a new barrel that was food grade, and in case it had metal bungs a removable end on it. Silver was thinking if it had, had metal bungs instead of plastic we could just take the whole top off to clean it out once a month. We traded for the barrel but I believe it would have cost $15.  We bought some screws with nuts that were 1/4-20-3in, this was to replace the screw that came with the kit where the screws would not be long enough we made sure to get about half of them flat instead of a rounded top to ensure that they would not interfere with the moving parts on the kit. That was $1.29 per package, we bought two packages. We bought a sanding disc for Silver's grinder to take off the paint on the outside of the barrel. That was $4.99  We did find a really good furnace cement that is almost like a putty... this item we are going to remember for when we build our house and make the rocket mass heater, as it is like refractory cement. That was 16oz for $3.99. We bought some (not wood stove) paint, for grills that are rated for over 2000 degrees at Loews for $5, to buy the stove paint would have cost us $10.  Now for the building process when we got the barrel at home Silver took the top off to see if whatever was stored in the barrel was flammable, I'm not sure if you want to call it good or bad luck; but our barrel had liquid vitamin E in it. ...btw... it doesn't burn. We had about half a quart of it still in the bottom that we smartly saved. Then Silver turned the barrel over to let what could drain out. Then we got a degreaser and washed the inside out. Then Silver proceeded to use the sanding disc to remove the outer paint off the top first, and then painted it to make sure the top was done, then he did each section of the barrel separately to ensure that if there was not enough sand paper or paint it would not be partly done. The next day, after the paint was fully dry (yeah I know it's spray paint and dries almost instantly, but it was almost sundown at that point) Silver started the cuts. He first cut out the section for the door.  Then he rolled the barrel over and cut the hole for the chimney on the exact opposite side. He put in the chimney flange and screwed that in place. We spent almost twenty minutes putting the door on, as we started with it having a gap around it from 0-2 inches. We needed to shrink that as much as we could, so Silver kept on tightening the nuts on the screws in rotation. We discovered one thing, make sure you check that the door will close evenly, then discovered that our door did not close all the way after we finished tightening the nuts. So we had to go back and loosen the nuts until the door would close.  So the recommendation would be for anyone duplicating this to check your door as you are going through your tightening. Silver said if you don't have it closing properly you might have the door crack when you light the stove. After fixing the door into place we placed the removable side back on,which we kept to the bottom because the bungs were plastic instead of metal. Like I had said before if they were metal we would have used the removable side on top so we could just take that side off for cleaning. However as we cannot keep the plastic near where the flames would be for obvious reasons. That's ok, it just gives me more cooking surface.  The next step we placed empty coffee cans on the bottom side of the stove, with the open end down. BTW the previous picture is after the cans...These are being used as part of an insulated “dead space” in the stove. Remember me mentioning the issue about all the wasted space? Well this way the extra space can be used to keep heat in the stove. After putting in the cans we took a bag of course vermiculite and filled the spaces and just barely covered the cans. Next we added another row of cans , these were the large fruit cans; smaller than #10 cans. This was then followed again by vermiculite, that then we covered with a few cut pieces of concrete board we had left over from last year as a base for our burn chamber. (the previous picture)We cut two pieces and set them inside in opposing positions.  On top of this we put down a piece of, I believe it's goat panel cut to fit over it; to be the reinforcing for the concrete mixture we are going to use in the burn chamber. Next we opened the container of fireplace cement and used it in the gap(s) around the door, fitting it on both sides of the door gap. Including the bodies of the screws, which; you will want to use a cut off blade and remove the ends or you may cut yourself on them. I happen to like the fireplace cement, and I'm thinking it might have uses when we go to make a rocket mass heater in the house when we build it. As Silver said it is like a refractory cement, which is what is used to make fire brick. The cement will cure at high temperatures only, so it will only dry until then. After filling the gaps in the door frame Silver mixed most of this bag of vermiculite:  And about 5 pounds of cement, he made the mixture fairly wet; to make it easier to get into the opening. Using a trowel he covered the fencing and concrete board with the cement vermiculite mixture. He smoothed it as much as he could and left it to dry. Now a moment to talk about the mixture, we tried out vermiculite concrete in our normal barrel stove last year in the bottom to protect it verses using the sand that the person who makes the stove kits recommends. It worked much better and never cracked. This time we used fine vermiculite, I do not know if this will change how it works but we will see. BTW use PORTLAND cement there are no stones.. we used standard cement and the stones are now coming loose. The original idea was to cover the sides of the burn chamber with the concrete mixture, but we didn't. We did a test burn outside the second day after putting in the concrete. Yes, outside; do -NOT- test your ideas on stove making in your home, if you do you might burn down or blow up your home. The sides only blackened, the paint did not even burn off on the inside and the top surface heated nicely. We were sitting about 3 feet from the stove and we were getting hot outside the house. I'm sure it'll be much warmer than we need it to be in here however that's ok for me. We have changed what goes around the heater as well, no concrete board this time as it's flimsiness bothered Silver. We are using cinder blocks dry stacked instead. So, lets see... I now have a heater that has a use for all it's space, I can cook on it. Also it takes up half the space it took last year. All for about $56.70 instead of buying a $180 small box heater with two small burner spaces... if you wanted to use them as such. ...or of course going back to a standard barrel stove. I think this will work out much better for us this winter and if there is a problem we do have our old barrel stove as backup. Be Well Be Safe and Blessed Be...
I know it's been a while since I have been on here.. over a year really. I thought it was about time I updated here as I have regular internet now. We tried out growing luffa gourds this last year and they did grow pretty good we got about 2 full sized sponges. One of the two had better seeds in it than the other. Funny thing about it was that the one with the better seeds is one I never noticed until we took the vines down once winter started. I did learn from it that it's a plant that while you need to thin some flowers the plant itself is pretty much self caring for. It is a voracious vine though, it tried to eat our electric pole.
We had tons of tomatoes this year and we have decided that the Cherokee orange purple smudge is the best for us. I have finally discovered why you need to trim the plants and cut back flowers. I have learned that if I don't understand why “they” say to do something I won't know until I figure it out myself.
I got my Tiger's eye beans to grow better than I thought, even though I didn't try to grow them. Odd how that the one I plant for “the heck of it” grew the best? Considering I can't find the seeds though I cannot eat them this year though, I have saved them all for next years planting. The “green bean” that I grew up growing.. well, it just didn't want to grow for me at all. I think we got maybe 20 beans and I planted ½ a pound of seeds. When I was a kid I could plant 10 seeds and get 10x's that.
My eggplants didn't do much of anything, as well as my bell peppers. The Rhubarb I ordered and planted grew a bit then quit on me. I hope they come back this year, we will see.
We have gotten the space for our house and our new chicken coop cleared fully. In 2 weeks we will be starting to buy the rebar to work on the house. We built a newer type of a barrel wood stove, we made it upright; and it takes up less than half the space. There is also no wasted space inside the stove, we also have the ability to cook on the top of it.
We also made an attempt at helping a friend out. A young man,who wants to be a woman who was living homeless. We invited her to live with us in exchange for being a “farm hand” to help me out with the day-to-day chores. It did -NOT- work out. I think it partly had to do with the person's age, and the desire of them to only play video games all the time. We just recently sent her to a place where she can spend tons of time playing video games with someone else 90% of the day.
So now I am hoping to keep this site up to date as my other blogs. Lets hope I do!
Be Well, Be Safe, and Blessed Be....
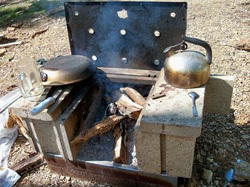 Now I mentioned in my previous post about this cook stove that Silver made for us last year. Now it was very easy to make. It has metal from what Silver said was a commercial stove that was left on our property and we discovered it when we moved here. He took the metal squares from the base and took the legs off which were later used to hold pots over the fire. The metals squares though were filled with large rock then gravel. The other piece of metal is that back piece, which was also in the original base.
The next thing Silver did was put two standard cinder blocks on the rock/gravel filled base and then filled them with again rocks first then gravel till full. Now I want to say you SHOULD let them sit a day or 2 to let the stones and gravel settle. Otherwise they will get hollow spots in them. Then Silver put the flat cinder blocks on top of the standard ones, just offset enough for the leg "grate" to go across. Now that back piece of metal is held in place with a cinder block that is filled with concrete that we found on site with a rock on top. There was also a broken flat cinder in back to cover and uncover holes on that metal based on how hot you want the fire.
Now here is the only main problem, once you heat the cinder blocks and they get wet. You CANNOT remove them or they will crack and/or break. While this can be built in lass than an hour with all the materials like I said take the time to let it settle the gravel before finishing it off.
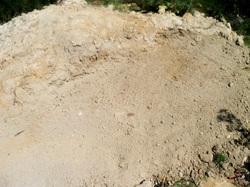 Now like I said we are going to do a cob oven and stove, and we aren't quite going to be doing the "standard" way of doing it. Now I wanted to embed this but I have yet to find the way too so here is a link to the "type" of cob oven we want to make. http://www.youtube.com/watch?v=1lGTGUo6tyQ&feature=channel_video_titleNow in case you were wondering why I am showing you a spot of "dirt" (it's actually clay). Well this is where we are going to build the stove and oven. This is the clay from our root cellar dig out (which we are still doing). After we filled in some "wet spots" on our property where we walk we just had the kids pile it here. Silver went out and hoed it down then raked and hoed it flat on one side. Then "tamped" it down a little to make it very flat. This will be our starting stop for both the stove and oven. The plan is to have a space between to hold wood for both. Now the stove will be redone in a more "rocket stove" manner with the outside covered in cob to help keep the heat in while we cook.
 This of course is the metal base from our first wood cook stove. Boy, did we have fun when we took the old one apart. Seems the local wasps had built a nest in one of the cinder blocks. It was pretty big too.
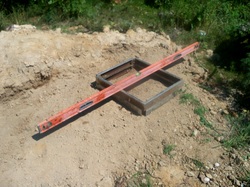
Now I'd like to point out that it's 2 pieces of metal in squares measuring a piece 2ftX24inX2in. So they aren't really all that big, but together they work well. Silver of course had to level it to make sure it was perfect.
Isn't that a pretty level it's a 6ft level that we only spent $14 on it at Harbor Freight Tools. Silver took me to their stores a few times and I was pleasantly surprised by them. I had never even heard of them until Silver told me about them. Anyway, I personally think a 6ft level is a very good tool for any homesteader whether you are "urban" or not.
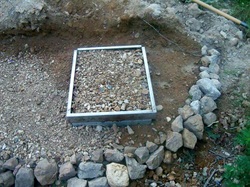 Now a few things have been done here. First Silver took the broken flat cinders (yep all the old ones broke like I mentioned above) and placed 4 pieces in the 4 corners of the metal to hold it in place. Then he put in rock and then filled with gravel. It has been sitting for 3 days now, partly due to the fact that it was raining yesterday.
We also had (at first) the kids put those rocks along the front, for decoration mostly. Silver went back through and straightened it a bit, and added more. He's good at eyeballing pieces that fit together.
Then he went and put gravel all along the flat surface that we are going to build on. Now the plan is to spread some concrete dust over it and let it dry in place hardening it to prevent "wash out". the hope is also that the gravel pieces will make little channels for water to go through. Silver thinks it will be pretty as well.
That is what we have so far, we need to do the concrete on it before we do anything else and for the cook stove we need to get some more cinder blocks. Silver wants to use earthbags for the base of the oven, we'll see what we can manage. Well at least the "platform" isn't the only thing we need to concrete. We also need to do the stairs into our home as it's just wood holding gravel. We've had to re-make those steps twice now so we REALLY need to get the concrete in it.
I'll update this as we go along.
Be Well, Be Safe and Blessed Be...
|
 The ground is just squishy enough to make it easy to get into the ground, I almost wish we had the ground rods to put into the ground, they would be very easy to get into the ground right now. While we were doing the pounding my son who doesn't currently attend a church got to stand in the middle of the mud circle and hold our 100ft tape to make sure we had the right length from the center. We also had to measure the distance between each one which needed to be 6ft 8in between each one. The rebar "arches" need to be slightly off of where we put our stakes so that there is an opening in the center of the top of the dome. traditionally this is where a chimney is put. We are going to put glass block windows, vents and a whole house fan in a small addition above the top of the dome in the center. Silver is planning to find a way to run the chimney up it as well, but we need to figure out the logistics of it first.
  The ground stakes have to be in the ground 2 foot so the 5 ft rebar stakes need to only have 3ft above the ground. So after placing all the stakes Silver went back around and pounded them into the ground till they reached the correct depth. We only had issue in one spot:
  I am not sure if you can see it, but this one here is stuck in a frozen block of clay, so once we have enough above freezing days we should be able to go back and fix this one. Well it figures we'd have one that would not be able to be at the proper depth. We should have really gone out and fixed some of the mud piles before the bad weather came through.. but you know what they say about hindsight. I'll also have you know that as I am writing this.. all that snow you see in the picture? Yeah... it's gone, not there... just the MUD! So when we finished putting the stakes in we spent some time looking for the orange "tape" to mark where the stakes are as they are a tad hard to see against the browns.
  It is much easier to see the outline with the tape on the rebar. also this is taken at the place where our door for the house will be put. The nice thing about it is that the door will open to just across from our soon to be outdoor kitchen. I think that is very convenient. As you can see from this picture there is much more mud than snow now, at this point we had the kids moving the rebar from up front to the house ring as Silver is going to start making the arches. The arches is what the second floor is suppose to be connected to so that it is more secure, I'm not sure if we are going to do it that way as yet and Silver is thinking we may only need to make half of a second floor based on how much space there is in the interior. As for the start of the arches...
  First, after we set out three pieces of rebar of course. We needed to bend the rebar, Silver discovered after trying to use his "bending" tool that it wasn't going to work very well. That is because when he first tried to bend it the tool bent. So as you can see he went and got out the pipe wrenches and used them with me standing on one end of the rebar while he hand bent them. The one downside I have to say for the birdcage dome site is that they do not mention how they bent their rebar. So we had to figure it out ourselves. So we had to bend two of three pieces, the two end pieces. The center piece gets bent when you attach them together. We discovered it's much easier to bend with the help of two children in addition to me standing on the rebar. So after the bending comes tying the rebar together.
  We are using rebar ties to connect them together, now we have seen people using zip ties. While they will hold a great deal, I think using the metal rebar ties will be 100% better as then they will be part of the concrete with the rebar. Silver is planning on using a couple of zip ties then we put the arches up and need to temporarily secure them to the rebar stakes while we get the others in place. Then will go around and use the metal ties to finish securing them. Incidentally we did not put this one in place as we have discovered we need to have a ladder or a scaffolding in place to do that as we need someone at the top to hold it in place while it is secured. As it is flimsy while being strong. I know once they are all in place they will be much more secure, jut one by itself would not be. We only put one arch together so as to get the "idea" of how to do it for the first time. Notice in the picture... no snow at all and all the MUD on Silver's shoes? That was after he scraped the MUD off. The kids finished bringing back all the rebar, after some issue over figuring out how to navigate over the trench while carrying the rebar. We found one random plank to place across it, and it's kinda working. One child of course fell into the trench and had a fit over getting muddy, I guess a 13yr old doesn't think MUD is fun anymore. Well at least she had changed into the jeans she didn't want to wear before it happened so the pants she prefers are saved for school. So now we are all sitting around the house MUDDY waiting turns to bathe the MUD off. I'll be last as I have to go back out in it to get the laundry down. Then it's on to start cooking our dinner tonight. which will be a beef roast mashed taters and peas. YUM! So I hope everyone enjoys their start of MUD season... I know I am... rolls eyes Be Well BE Safe and Blessed BE...


 RSS Feed