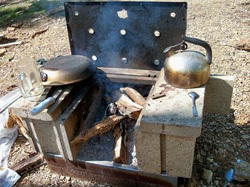
Now I mentioned in my previous post about this cook stove that Silver made for us last year. Now it was very easy to make. It has metal from what Silver said was a commercial stove that was left on our property and we discovered it when we moved here. He took the metal squares from the base and took the legs off which were later used to hold pots over the fire. The metals squares though were filled with large rock then gravel. The other piece of metal is that back piece, which was also in the original base.
The next thing Silver did was put two standard cinder blocks on the rock/gravel filled base and then filled them with again rocks first then gravel till full. Now I want to say you SHOULD let them sit a day or 2 to let the stones and gravel settle. Otherwise they will get hollow spots in them. Then Silver put the flat cinder blocks on top of the standard ones, just offset enough for the leg "grate" to go across. Now that back piece of metal is held in place with a cinder block that is filled with concrete that we found on site with a rock on top. There was also a broken flat cinder in back to cover and uncover holes on that metal based on how hot you want the fire.
Now here is the only main problem, once you heat the cinder blocks and they get wet. You CANNOT remove them or they will crack and/or break. While this can be built in lass than an hour with all the materials like I said take the time to let it settle the gravel before finishing it off.
Now like I said we are going to do a cob oven and stove, and we aren't quite going to be doing the "standard" way of doing it. Now I wanted to embed this but I have yet to find the way too so here is a link to the "type" of cob oven we want to make.http://www.youtube.com/watch?v=1lGTGUo6tyQ&feature=channel_video_title
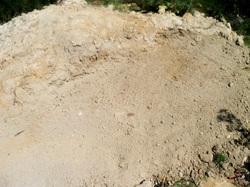
Now in case you were wondering why I am showing you a spot of "dirt" (it's actually clay). Well this is where we are going to build the stove and oven. This is the clay from our root cellar dig out (which we are still doing). After we filled in some "wet spots" on our property where we walk we just had the kids pile it here. Silver went out and hoed it down then raked and hoed it flat on one side. Then "tamped" it down a little to make it very flat. This will be our starting stop for both the stove and oven. The plan is to have a space between to hold wood for both. Now the stove will be redone in a more "rocket stove" manner with the outside covered in cob to help keep the heat in while we cook.
Now in case you were wondering why I am showing you a spot of "dirt" (it's actually clay). Well this is where we are going to build the stove and oven. This is the clay from our root cellar dig out (which we are still doing). After we filled in some "wet spots" on our property where we walk we just had the kids pile it here. Silver went out and hoed it down then raked and hoed it flat on one side. Then "tamped" it down a little to make it very flat. This will be our starting stop for both the stove and oven. The plan is to have a space between to hold wood for both. Now the stove will be redone in a more "rocket stove" manner with the outside covered in cob to help keep the heat in while we cook.
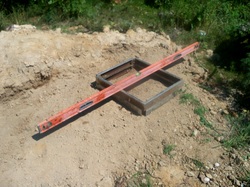
This of course is the metal base from our first wood cook stove. Boy, did we have fun when we took the old one apart. Seems the local wasps had built a nest in one of the cinder blocks. It was pretty big too.
Now I'd like to point out that it's 2 pieces of metal in squares measuring a piece 2ftX24inX2in. So they aren't really all that big, but together they work well. Silver of course had to level it to make sure it was perfect.
Isn't that a pretty level it's a 6ft level that we only spent $14 on it at Harbor Freight Tools. Silver took me to their stores a few times and I was pleasantly surprised by them. I had never even heard of them until Silver told me about them. Anyway, I personally think a 6ft level is a very good tool for any homesteader whether you are "urban" or not.
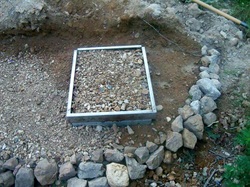
Now a few things have been done here. First Silver took the broken flat cinders (yep all the old ones broke like I mentioned above) and placed 4 pieces in the 4 corners of the metal to hold it in place. Then he put in rock and then filled with gravel. It has been sitting for 3 days now, partly due to the fact that it was raining yesterday.
We also had (at first) the kids put those rocks along the front, for decoration mostly. Silver went back through and straightened it a bit, and added more. He's good at eyeballing pieces that fit together.
Then he went and put gravel all along the flat surface that we are going to build on. Now the plan is to spread some concrete dust over it and let it dry in place hardening it to prevent "wash out". the hope is also that the gravel pieces will make little channels for water to go through. Silver thinks it will be pretty as well.
That is what we have so far, we need to do the concrete on it before we do anything else and for the cook stove we need to get some more cinder blocks. Silver wants to use earthbags for the base of the oven, we'll see what we can manage. Well at least the "platform" isn't the only thing we need to concrete. We also need to do the stairs into our home as it's just wood holding gravel. We've had to re-make those steps twice now so we REALLY need to get the concrete in it.
I'll update this as we go along.
Be Well, Be Safe and Blessed Be...

 RSS Feed