WOW, we finally got some rain here. Not only that, but it rained for almost a whole hour! We really needed that rain and I am very glad we got it. I do hope my friend and her family in Kansas get some as well.
I harvested all of our potatoes this morning and I think we got about 5(?) pounds of them, I don't have a scale here so I am not totally sure on the weight. As I have pulled up all of them I also moved our compost pile over to where our potatoes were so they can "work" with the composting straw and make us some pretty compost. We will see if there is some by next spring, I do need to buy a black tarp to cover it though.
We got down to about 2 ft in our root cellar so far. So we are hoping it keeps going pretty steady on it, I'll post some pictures of everything later on the photo page.
while yes we do use power/oil and there is not much we can due to stop using it for now. We can reduce our needs for it. We for one only fill up our gas tank once a month and if we get down to only enough gas to get us tot he gas station, well then we don't go anywhere till the month is over.
We are also not using heavy equipment to build here, the most power hungry item we use to "build" right now is our drill for the root cellar. It's slow work, but I feel good about it.
In the city when I lived near Chicago I rarely used a car. If I had to go somewhere I used a bus, that is using less as they -will- be running no matter what (just the amount of runs will change). For areas where bus/train service is spotty the more riders the more "runs" they will have.
The most electric we use during the day is maybe 2 computers and our air goes -OFF- during the hottest part of the day. It only really helps us here during the night so it's a waste of power to use it during the day.
Personally I'd love to have our home set up like an Amish home, and we are planning to buy a hand water pump next spring. Once the full house is done, hell once my cob oven and outdoor stove is done; I'm -NOT- going to be using my electric range/oven. I know of one blogger that isn't using a fridge, but she is using a freezer.
I am hoping that down the line once our chickens start producing we can reduce our fridge use, the big thing we are storing in ours right now is eggs. I know for a fact that fresh eggs can sit out for a day or 2, and with how we eat eggs here they wouldn't last more than 2 days.
I'd like to issue a challenge to all my readers out there... A ONE FILLUP A MONTH challenge! Lets see if you can manage your life and world on one tank of gas a month. I am sure to those who have to drive to work can find other methods of getting to work if they looked. I have seen small towns with bus service, if you plan your day accordingly For those of you who do it post your results!
I have read some interesting stuff about what has been going on with this drought that has been bothering the central US, ourselves included. I know that some of my plants are not doing as well as they did last year and that it has been hotter. I have stumbled on this article about poultry farmers and their plight in this heat wave/drought: http://www.foxnews.com/us/2011/07/13/kansas-poultry-farm-loses-4300-turkeys-in-heat-wave/Expect your Thanksgiving and Christmas turkeys to go up in price. However, that is not the only thing to go up in price from what I have seen. One of my favorite bloggers on Blogger Phelan, lives in KS and has been looking into what has been going on around her. The people who grow the hay that she buys has nothing in their fields, and she is seriously thinking of getting rid of a good amount of her cattle because of it. She's got rabbits dieing as well as chickens dieing too. Now like Phelan I have not heard a great deal about this drought/heat wave on the mainstream media, that does bother me. What will people think when they go to the store and find that prices have gone up? Especially when there is no explanation by the media that is suppose to let them know what is going on in the world. Folks keep an eye on this situation and remember that if the plants can't grow the prices will go up! Also please remember if you are in one of the areas with the intense heat please stay out of the sun at the hottest point of the day and keep hydrated and watch your salt content as you -WILL- lose salt when you sweat. BE Well, Be Safe and Blessed Be...
Sorry folks but this will be a multi post across the board as this is important. The Health Ranger over at naturalnews.com is calling for a boycott of Scotts lawn products due to their soon to be newest product. What could this product be? GM grass seed... yes, - GRASS SEED- if it was not bad enough to have GMO's that were food stuffs people are going to be pushed to buy a GM grass seed that is “roundup ready”. http://www.naturalnews.com/033022_Scotts_Miracle-Gro_GMO_seeds.html Yippie... so now everyone who wants the “perfect lawn” will be pouring gallons of roundup on their lawns. What will eventually happen to the water tables in these areas? Poison is still poison no matter how you “bottle” it. It will still affect the rest of the environment that you put it in. How are you going to feel when the lawns at schools are sown with this seed and they start pouring roundup all over the grass that -YOUR- child will be walking/running/playing over? What happens when it cross pollinates with natural grasses? We'll have GM grass everywhere eventually. Also remember what I said about corn? Corn is a “grass”, it is a distant cousin to what is on the lawns in the cities. However, anyone who is trying to strengthen a “old” variety of corn with crossing it with the wild ancestor. What will happen to that ancestor plant? With the idea of this going to happen what I see will be happening is that we will have a “new” urban desert a green one. It will be grass and nothing else, of course you could plant the GM trees so that maybe you'll have a tree in your yard too. Trees are hurt by round up just as any other plant is. Home vegetable gardeners and “urban” homesteaders will have major issues when their neighbors grow this grass, due to the spraying of the chemicals on the GM grass. As the spray -WILL- carry over to your yard. So protect yourself now.. protest THIS ONE if nothing else in the GM area. Check out the Health Ranger's post on naturalnews.com to see how you can voice your opinion on this subject!
I don't know if anyone read my "new addition" to my GMO page, but here is a statement on what I wrote there yesterday..
Just in case I hear it here about my last post...
seems everyone who reads this thinks I am complaining about hybrids. I was trying to make a statment about the idea of making a "seedless" anything... which to me.. seems very silly... and even though hybrids occur in nature a "seedless" one wouldn't truly last in nature so it seems a bit like what the Big M is doing...
everyone however is just seeing me say ... "hybrid BAD"....which I'm not... I was talking about 1 type. I did not think I was bashing hybrids, but it seems for at least 3 other places I have posted that post on seeds that people think I am bashing hybrids.
I do think hybrids are a good idea, however when you come across something like the seedless watermelon, which I have heard many people complain about it not "tasting like a watermelon". what is the real point behind it? To me it just seems like it was made just so that seeds had to be re bought every year thereby making the seed company lots of money.
This morning I cut up a yellow fleshed watermelon that I bought locally. It had that "watermelon" flavor that I remember when I was a young child. It tasted nothing like the typical "Seedless" watermelon you find in stores now. I have saved the seeds from it, and my kids were surprised by how large the seeds were. I have to say they looked big to me as well.
If you go back and look at GMO history though you will see something. The tomato, there was a GM tomato once; but the people complained that ti had no flavor compared to other store bought ones. So why is it when you have these "seedless" watermelons that to me have no flavor, people don't complain? People don't know the difference... they really don't, I mean how long has the seedless watermelon been out there? At least 20 years if my memory is right. So after 20 years that is the flavor that people are use to and now want.
So please... just because I have an issue with 1 hybrid... and compared it to a GM product... which to me has some similar things to some GM products. Does not mean I don't like hybrids, some of the tomato hybrids are wonderful. I would love to grow that all pink one that I read about how the person who "discovered it" wound up growing it. That one was used as a way to explain hybridization to people who know nothing about it.
Now here is the nice thing about a -BLOG- it's mostly a personal opinion on what the person writes. I do try to have accurate info included in what I write and sometimes my opinions shine through more. Such is the case with yesterday's post.
I love fresh bread, just ask anyone! I also really love my sourdough so when I found this new recipe I had to share it.
Now I am at this moment baking some of this bread, yeah it's a tad late in the day for us. However, we have a VERY good reason for it. I found another no-knead bread recipe for my sourdough. It's a white bread recipe, that you make a "batter" in the long rise time; it seems more like a sponge though.
The book is called:
"Adventures in sourdough Cooking & Baking"
By: Charles D Wilford
Copyright 1971 and 1977
ISBN# 0-912936-00-2
The First part of the recipe Page 31:
Primary Batter "B"
Ingredients:
1C sourdough starter
1 & 1/2 C white flour
1 C warm water
Yield:
1 & 1/2 C Primary Batter "B" for baking
1 C batter to return to your starter
2 & 1/2 C total
1. Assemble all ingredients and utensils
2. Remove your sourdough starter from the refrigerator and stir well. Take out one cup and place it in a warm bowl of 2 qt capacity or larger. Return remaining starter to refrigerator. The large size bowl is necessary to prevent spillage as the batter will expand greatly during it's proofing period. The final quantity will be around 2 & 1/2 or 4 cups total.
3. Add the warm water and stir until well mixed. Slowly add the white flour stirring continually to blend the flour in well. Stir 4 to 5 minutes or until the mixture is smooth and lump free, or use an egg beater or electric mixer. (yes it says a MIXER!)
4. Cover the bowl with plastic wrap and place in a warm, draft free area for proofing. (now I use a plate that fits over my bowl and it works fine)
5. The proofing period is 8 to 12 hours depending on how active your starter is when taken from the refrigerator. Your batter is ready when it is foamy and full of large bubbles. It can be used at any time after this point up to 4 hours. If your batter has many tiny bubbles in it, it has already reached the proper state. If no or few bubbles are present during the 8 to 12 hours after proofing your starter is not acting properly and you should determine the reason for this before continuing with the recipe.
6. During the proofing period there is a chance that crust will form at the top of your batter. If this happens just stir it back down into the batter. The same is true of any liquid which might form on top.
7. At the end of the proofing period stir the batter thoroughly. Take out one cup and put back into your starter container. Stir your starter thoroughly and return it to your refrigerator.
White Bread recipe on page 86
No-knead Sourdough Bread (white)
ingredients:
1 & 1/2 C Primary Batter "b"
1/2 C warm milk (I let it get to room temp)
1 &1/2 t salt
2 T sugar
2 T cooking oil or melted Shortening (I use butter)
1 egg
2 & 1/2 C flour
Yield: 1 loaf
1. Prepare the Primary Batter "B" following the directions in Chapter 4. Be sure that you return one cup of batter to your sourdough starter container before adding any other ingredients.
2. Assemble all ingredients and utensils. Let all ingredients come to room temperature.
3. In a warm 4qt bowl (I use my 8 qt pots) mix the milk, salt, sugar and cooking oil together.
4. Beat the egg well and (then) mix it thoroughly into the mixture in step 3
5. Add the 1 & 1/2 cups of Primary Batter "B" and mix well again.
6. Add 2 & 1/2 cups of flour, 1/2 cup at a time; and beat vigorously until all the flour is blended in. Scrape down the sides of the bowl.
7. Cover the bowl and set in a warm 85 degree place for about 2 hours for proofing. When dough has doubled in bulk stir it down thoroughly. (now I find this one "odd" no "punching" down)
8. Pour into a well greased loaf pan and spread it out evenly. Pat the top smooth with floured hands (btw.. I have not done this in the 2 times I have tired this)
9. Cover with a cloth and let rise in a warm 85 degree place until it reaches about 1 inch from the top of the pan. About 1 hour and 45 minutes.
10. bake in a preheated 375 degree oven for 45 minutes. When bread starts to shrink away from the sides of the pan it is done.
11. When done, remove bread from the oven and brush the top with melted butter. Place on a wire rack to cool immediately.
Now this produces a beautiful loaf of bread, so good that when we made it the first time we ate the whole loaf as soon as it was cool. Well... ok... not quite all the way cooled. It is very good and I suggest trying it out. My family loved it, I am sure your's will too.
Be Well, Be safe and Blessed be
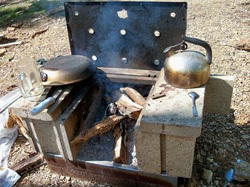 Now I mentioned in my previous post about this cook stove that Silver made for us last year. Now it was very easy to make. It has metal from what Silver said was a commercial stove that was left on our property and we discovered it when we moved here. He took the metal squares from the base and took the legs off which were later used to hold pots over the fire. The metals squares though were filled with large rock then gravel. The other piece of metal is that back piece, which was also in the original base.
The next thing Silver did was put two standard cinder blocks on the rock/gravel filled base and then filled them with again rocks first then gravel till full. Now I want to say you SHOULD let them sit a day or 2 to let the stones and gravel settle. Otherwise they will get hollow spots in them. Then Silver put the flat cinder blocks on top of the standard ones, just offset enough for the leg "grate" to go across. Now that back piece of metal is held in place with a cinder block that is filled with concrete that we found on site with a rock on top. There was also a broken flat cinder in back to cover and uncover holes on that metal based on how hot you want the fire.
Now here is the only main problem, once you heat the cinder blocks and they get wet. You CANNOT remove them or they will crack and/or break. While this can be built in lass than an hour with all the materials like I said take the time to let it settle the gravel before finishing it off.
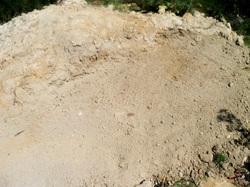 Now like I said we are going to do a cob oven and stove, and we aren't quite going to be doing the "standard" way of doing it. Now I wanted to embed this but I have yet to find the way too so here is a link to the "type" of cob oven we want to make. http://www.youtube.com/watch?v=1lGTGUo6tyQ&feature=channel_video_titleNow in case you were wondering why I am showing you a spot of "dirt" (it's actually clay). Well this is where we are going to build the stove and oven. This is the clay from our root cellar dig out (which we are still doing). After we filled in some "wet spots" on our property where we walk we just had the kids pile it here. Silver went out and hoed it down then raked and hoed it flat on one side. Then "tamped" it down a little to make it very flat. This will be our starting stop for both the stove and oven. The plan is to have a space between to hold wood for both. Now the stove will be redone in a more "rocket stove" manner with the outside covered in cob to help keep the heat in while we cook.
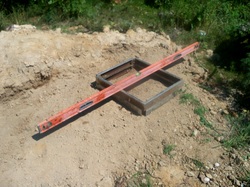 This of course is the metal base from our first wood cook stove. Boy, did we have fun when we took the old one apart. Seems the local wasps had built a nest in one of the cinder blocks. It was pretty big too.
Now I'd like to point out that it's 2 pieces of metal in squares measuring a piece 2ftX24inX2in. So they aren't really all that big, but together they work well. Silver of course had to level it to make sure it was perfect.
Isn't that a pretty level it's a 6ft level that we only spent $14 on it at Harbor Freight Tools. Silver took me to their stores a few times and I was pleasantly surprised by them. I had never even heard of them until Silver told me about them. Anyway, I personally think a 6ft level is a very good tool for any homesteader whether you are "urban" or not.
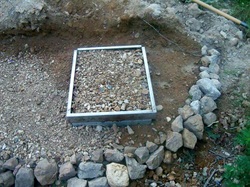 Now a few things have been done here. First Silver took the broken flat cinders (yep all the old ones broke like I mentioned above) and placed 4 pieces in the 4 corners of the metal to hold it in place. Then he put in rock and then filled with gravel. It has been sitting for 3 days now, partly due to the fact that it was raining yesterday.
We also had (at first) the kids put those rocks along the front, for decoration mostly. Silver went back through and straightened it a bit, and added more. He's good at eyeballing pieces that fit together.
Then he went and put gravel all along the flat surface that we are going to build on. Now the plan is to spread some concrete dust over it and let it dry in place hardening it to prevent "wash out". the hope is also that the gravel pieces will make little channels for water to go through. Silver thinks it will be pretty as well.
That is what we have so far, we need to do the concrete on it before we do anything else and for the cook stove we need to get some more cinder blocks. Silver wants to use earthbags for the base of the oven, we'll see what we can manage. Well at least the "platform" isn't the only thing we need to concrete. We also need to do the stairs into our home as it's just wood holding gravel. We've had to re-make those steps twice now so we REALLY need to get the concrete in it.
I'll update this as we go along.
Be Well, Be Safe and Blessed Be...
Hello!
For those of you who have not seen my blogs on Blogger or Word Press let me tell you about us. First I am 35 and a mom of 3 wonderful kids (yes my name rivenfae is fictitious, but I have my reasons) , my boyfriend is almost 53 and we live on 5.29 acres of land in the Missouri woods.
We moved here in April of 2010 and have had quite an experience. We started off in a tent and having to haul our own water from a neighbor's house. Let me tell you living in a tent is fun... until you do it for 6+ months with 3 kids. After about 4 months we had our power hooked up which required a $350 deposit here, so we had to manage to have that much money at one time to pay it out.
Before we had the power on and could use our deep freeze we had been only buying non-perishable foods to eat, which isn't as bad as you might think. It does take some getting use to only using canned meats in inventive ways. Oddly enough almost a year later with one of those "dishes" we are thinking of buying a few different canned meats to "recapture" some flavors we discovered we liked.  This is one of the "cook stoves" we had last year we built this one ourselves, all the metal on it was trash that was on our property. We had gotten so good at cooking with a wood fire that when we moved into our current (not final) home a 12X24 shed and started using a electric stove we wound up burning our food a few times till we got use to -NOT- cooking on wood. We are rebuilding this in a new location as summer's heat is horrible here for cooking anything, but we have learned a couple of things that will change how we do it. The cinder blocks we used when they are repeatedly heated and then get wet when you go to move them after they will break. As all homesteaders I have a garden, last year during our first year we just dug up and planted right in the ground. However, we did get for free a truckload of composted goat manure that i later added to the soil. i did learn things will grow in our very heavy clay soil. Just very slowly and that we need to water it a lot. So this year we have done a few things different, first the ground that got the goat manure is much better this year (no real surprise there), and all the amendment we put in; was straw once the plants were grown enough to put it down without choking the seedlings. We have started foraging more this year than last i have over a quart of blackberries in my freezer right now waiting till the season is over so I can make some jelly/jam for the first time. It will be a multi-berry as I do have a wild blue berry nearby and I have gotten the few I found there to the blackberries. i am also hoping to add rose hips to it for vitamin C content. I have also come up with a wonderful Lamb's Quarter wilted salad that one of my kids and Silver likes. We eat that once or twice a week, people say they taste like spinach; I don't think so. I can't place the taste either. As i said we are now living in a 12X24 shed, we got it delivered back in October and my 2 girls sleep in bunk beds built into the wall, my son is in the loft and me and my boy friend have a "room" next to the "toilet room". Our "toilet room" is just that our toilet is in it. It is a saw dust toilet, if you don't know what one is here is a link: http://www.youtube.com/watch?v=FPg-n4czGE0I am surprised at how well this system works and you don't waste any water or have to worry about a septic backing up. We currently have a bath tub in a outdoor room in back that we use in warm weather (above 40 degrees). We are working towards building 2 additions onto this shed. One will be a better sleeping area for the kids and also a tv room. The other will be a bathroom, in which we will have a flush toilet (yeah!) and a shower. They will be built once we finish digging (by hand) our root cellar.Yes we are digging a root cellar and guess what...? It's soo easy! One of the biggest things that has helped is what we are using to "break" through the clay. It is a bulb planting drill bit that eats up clay. We put it on our masonry drill and it will tear right through the clay. then we just shovel the clay out. We have about 4 ft down to still go. Right now I believe it is 8X10X2ft. We need it just a bit deeper, which should be the easiest part.We are going to use all the clay we are digging up as well as we are going to build a cob-ish oven like this one: http://www.youtube.com/watch?v=1lGTGUo6tyQNot quite that one but very close as we are going to use a steel barrel for the body. I have a turkey in my chicken yard that is going to be a bit to big for my current oven so we'll need the cob-ish oven. When we put the addition on we will be using a rocket mass heater in it, this way we won't use any electricity for our heat this winter. We used just space heaters last year and our power bill went very high. For us wood is free so lets go with wood.So I hope you keep coming around to check us out here at Wolf Woods!Be Well and Blessed Be...
|
 RSS Feed